Effects are not lifecycles

You can’t write lifecycles with useEffect.

With React hooks being widely regarded as “better” than using classes in the React community, both for new users and for experienced developers, there’s a wide pattern of developer migration to learn the new tools.

Most of these developers are bringing with them the concepts they’ve gotten used to with React classes and even from non-React frameworks or tools. Some of these are easy to directly transfer across: It’s not terribly hard to pick up useState if you are used to class state, and useRef is fairly straight forward for many as well, once they get the basic concept of how hooks hold on to state.

Lifecycles are “when” you do things

React class component authors are used to writing functionality in lifecycles, and lifecycles don’t exist with hooks. You can emulate them if you’re careful, maybe using some useRef instances to reference changing props because of closures. But emulating lifecycles is a bad idea, and the reason why is this: Effects are a higher-level abstraction than lifecycles.

When you use a lifecycle like componentDidMount, or componentDidUpdate (let alone the older deprecated lifecycles which ran at different stages), you must think in terms of when something should happen. “I want the data loaded when the component mounts.” “I want to load data if when the component updates with a new X prop.” This idea of “when” is procedural thinking. The “when” concept isn’t actually important, but because the tool for completing these tasks is lifecycles, you need to map the “what” that you want to do, to the “when” of a specific lifecycle.

Well I’m here to tell you to forget all of that. Seriously, forget the concept of “when” entirely. You don’t care when something happens. You really don’t. You think you might for this specific thing? You don’t.

Effects are “what”, not “when”

React is a strict model. It’s part of why it’s so powerful and flexible. The model says “given X state, the view should be viewFunction(X)”. For a long time, we had to break this model for anything that wasn’t direct view output. Instead of “given X state, do effectFunction(X)”, we had to break down when we wanted those things to happen, and sort them into lifecycle methods.

With useEffect, you say “given X state, do effectFunction(x)”. What’s important now is just what your state is, and what you should do given that state. “When” doesn’t matter anymore. With lifecycles, you would do async loads of your data in componentDidMount. You did it at mount, because you know it’s not previously been done then. But do you actually care about it being at mount? Isn’t what really matters that you load the data if it hasn’t already been loaded? So we just boiled it down to the important part: If our data is not yet loaded, then load the data.

That concept is how useEffect works. We don’t care that the component is mounting, we just write in our useEffect that we want the data to be loaded if it hasn’t been already. What’s more, from a high level, we don’t usually even care if it loads the data multiple times, just that the data gets loaded.

What it looks like in code

Now we’ve boiled down the what that we want to do. “When data isn’t loaded, load the data.”

The naive approach looks like this:

1
2
3
4
5
6
7
8
9
10
11
const [isLoaded, setLoaded] = useState(false);
const [data, setData] = useState(null);
useEffect(() => {
if (isLoaded === false) {
loadData().then(data => {
setData(data);
setLoaded(true);
});
}
});

This code works. It’s the most naive approach given our concept of what we want, but it works perfectly fine.

Arguably, there are more naive approaches, but we’re making the assumption here that we already know how hooks work, so we aren’t taking into consideration putting the useEffect() inside the condition, since that is a known error.

Let’s compare that to what the code looks like if you emulate componentDidMount using [] as a second argument.

1
2
3
4
5
6
7
8
const [data, setData] = useState(null);
useEffect(() => {
loadData().then(data => {
setData(data);
setLoaded(true);
});
}, []);

At first glance, there is less code involved, which you might argue is a good thing. But this code doesn’t describe the situation as well. We have implicit state. It looks like loadData() should run every time, because there is no semantic code which says it won’t. In other words, we aren’t describing what the code is actually supposed to do. If you remove the [], then this code looks almost identical, but simply doesn’t work properly (it always loads data, instead of only if we need it). What’s more, we very likely need the loading state in render anyway, and while you can assume that null data means it’s not loaded, you are breaking single responsibility principle by overloading the meaning of a variable.

This is a very common stumbling block that people trip over when learning hooks, because they try to emulate lifecycles.

Optimizing

Now, for practical purposes, we don’t actually want the loadData function called more than once. If you follow the simplest application of what belongs in the useEffect dependencies argument (every outside reference), this is automatically fixed:

1
2
3
4
5
6
7
8
9
10
11
const [isLoaded, setLoaded] = useState(false);
const [data, setData] = useState(null);
useEffect(() => {
if (isLoaded === false) {
loadData().then(data => {
setData(data);
setLoaded(true);
});
}
}, [isLoaded, loadData, setData, setLoaded]);

The two setters won’t change, but they are semantically deps of the function, and maybe down the road they get replaced by something that might change. We’ll assume for now that loadData won’t change (if it did, it will only trigger a new call if isLoaded is still false). Our key dependency here is isLoaded. In the first pass, React automatically runs the effect, and isLoaded is false, so loadData() is called. If the component renders again while isLoaded is still false, the deps won’t have changed, so the effect won’t run again.

Once loadData() resolves, isLoaded is set true. The effect runs again, but this time the condition is false, so loadData() isn’t called.

What’s important to take away from this is that the dependency argument didn’t change our functionality at all, it just reduced unnecessary calls to a function.

But what about things that shouldn’t be loaded more than once!

Ah, right. Maybe it’s making a call which changes something somewhere else. It should only be called once when needed.

This means our “what” changed. It’s no longer “if not loaded, load data”, it’s now: “if not loaded, and not already loading, load data.” Because our “what” changed, our semantic code should change too.

We could simply add an isLoading state, but then we could have something confusing happen like isLoading and isLoaded both true! Since these state should be exclusive, that means they are also related. And more than related, they are actually the same state field (the data status), just different values.

So now we change our state code to reflect our new “what”:

1
2
3
4
5
6
7
8
9
10
11
12
const [dataStatus, setDataStatus] = useState('empty');
const [data, setData] = useState(null);
useEffect(() => {
if (dataStatus === 'empty') {
loadData().then(data => {
setData(data);
setDataStatus('available');
});
setDataStatus('loading');
}
});

Now we have code which only calls loadData() when we need it and it isn’t already loading, AND it doesn’t use the dependency argument of useEffect.

Additionally, the different parts of our state are all explicitly included here.

Tell me what to do!

So, forget about lifecycles, mounting, updates, and generally “when” thing happen. Just completely put it out of your head.

Think about what you need to do, and what the states are that should cause those things to happen.

Model those states explicitly in your code, and model the effects run based on those states.

Your code should always work without using the second argument to useEffect. If you need, the second argument, you are probably incorrectly coding your functionality.
Does Using React Negatively Affect SEO?

Original gist

The effect on SEO related to React comes from doing client-side rendering only. So this isn’t React specific, any client-side-only view will suffer from this. But yes, SEO explicitly suffers for non-Google search engines which don’t run the JavaScript for a page. Basically, your page is effectively blank. Google does run JavaScript, but their algorithm is intentionally quite complex and takes into account many factors, some of which (like initial render performance) can be affected by using only client-side rendering.

In reality, most sites where SEO matters for the pages probably should not be rendered on the client, or at least not on the client only. The web is designed around servers generating html, and unless you have a strong reason not to, it’s better to fall in with that paradigm by default.

So then, there are two ways React can still be valuable, even when rendering on the server. The simpler way is to just use React as a server side templating language. I’ve been doing this on a current project, and it works quite nicely. JSX is handled on Node by compiling your server code with the Babel cli. Now, certain frequently-used features for front end that are normally handled by Webpack don’t have great support and can be much more of a pain to setup (css-modules, file/image imports), but if you just treat React like any other templating language (e.g., Pug), it’s not really any worse, and I prefer it personally.

The other option is using hydrated React SSR. Frequently this is just referred to as “React SSR” or even just “SSR”, but I try to explicitly saying “hydrated” here because “SSR” simply stands for Server Side Rendering, which nominally describes basically anything that isn’t client-side rendered.

Hydrated SSR means you share React components on the server and client, render on the server for the first request, the client code runs and “hydrates” it (the client renders a second time, ensuring it matches what the server rendered and attaching event listeners), and then client routing and rendering take over from there.

Hydrated SSR sounds great, but realize you get nearly all the downsides and only some of the upsides of doing both client and server rendering. It makes the codebase more complex and heavier. If you aren’t using a Node (JavaScript) backend, then it adds significant complexity. And while it does improve SEO for non-Google crawlers, it doesn’t necessarily improve the performance, and can hurt Time to Interactive. If your site isn’t at least minimally usable without JavaScript on the client at all, it’s not doing much for you. And to make it usable without JavaScript, you need to do more work on the server side for handling forms and such.

So, the progressions of what usually makes sense to use, starting with lower complexity web sites, and progressing to high-interactivity web apps:

web site/app type examples likely best way to implement
Simple static websites “postcard” sites, marketting landing pages Just generate static html. Static site generators are great tools, and there are quite a few to fit tastes.
Simple dynamic content websites blogs, forums, some ecommerce Render html on the server using a templating language, do minor UI enhancements with JS on the client.
Dynamic content with complex interactions Social media, some ecommerce Render html on the server where possible, replace functionality on the client with JS (React can be a useful tool).
Highly interactive content Maps, chatrooms, games, some admin interfaces, dashboards Render base html on the server, maybe static if no extra data is needed, render significant parts of the UI on the client (React is great for this).

If you look at the progression here, you’ll notice that the likely importance of SEO generally goes from high to low as you move down the table. This works out, since the html generated by the server for the earlier entries will be more SEO friendly.

Where hydrated React SSR comes in is when you need SEO for dynamic, interactive content in the lower parts of the table. A notable example of a large scale website where they feel the complexity trade-offs are necessary for SEO and accessibility is Airbnb (which is also largely (or fully?) designed to function without client-side JavaScript).

How to Setup Webpack v4

These docs are written for Webpack version 4, and Babel version 7.

If you write JavaScript code you should be using a module system. For the browser, this means bundling, since built-in module support isn’t yet ready to be used in production.

Bundler: A tool which compiles a module-based codebase into a single (or a few) large file to be linked from your HTML.

The industry standard tool for bundling is Webpack. In the past, Webpack had a bad rep for being difficult to configure because it’s documentation was lacking, and because new users were often shown bloated examples including features they might never use. Since then, the documentation has dramatically improved. In this guide, we’ll focus on what you need to get started!

The Webpack documentation is really quite good, but it can be hard to filter to just what you need. This guide is meant to be the minimal parts you really need for development and production.

Prerequisites

Primarily, you need to have Node.js installed. This guide assumes you are using current Node v10+ and npm 6+.

For Linux and MacOS, the easiest way to install and work with Node is using nvm. Instructions for installing are on the nvm project page.

If using Windows, you can download an installer from the Node.js website.

The instructions are the same for Webpack in Windows, except you might use backslashes instead of slashes for paths on the command line. For example, webpack src/main.js public/bundle.js might be webpack src\main.js public\bundle.js in Windows.

Create a project

First, create a project folder (such as myproject). In the project folder open a terminal and run npm init, and answer the questions. (You can also run npm init -y to skip all the questions and use defaults.)

From here on out, all command line snippets will assume you are currently in the project folder root.

Add Webpack to your development dependencies: npm install --save-dev webpack webpack-cli.

From here on in this guide, we’ll use the shorthand npm commands like npm i (for npm install) and npm i -D (for install --save-dev).

Create a folder in your project called src.

Inside src/, add two JavaScript files:

src/index.js:

1
2
3
4
5
import foo from './foo';
console.log('Running in index.js!');
foo();

src/foo.js:

1
2
3
4
5
6
7
import camelCase from 'camelcase';
function foo () {
console.log(camelCase('Running in foo.js!'));
}
export default foo;

And do npm i camelcase.

The camelcase module is being used here as an example to show that you can import and bundle npm modules.

There are things missing that you should have in a “real” project, like linting. Feel free to add them, but they are out of scope for this article to cover.

Bundling

Webpack has some defaults which allow you to do very basic bundling without any configuration. It will try to use src/index.js as an entrypoint, and it will output the bundle(s) to dist/.

Entrypoints are files you directly link to with script tags. Webpack can bundle multiple entrypoints in a single build, and can share common dependencies between them if configured to do so. Each entrypoint will have it own output bundle file.

We can just run npx webpack and it will bundle our files into dist/main.js. While not necessary for Webpack, we’ll create an index.html file and start a static server.

Add dist/index.html

1
2
3
4
5
6
7
8
9
10
11
12
13
<!DOCTYPE html>
<html lang="en">
<head>
<meta charset="UTF-8">
<meta name="viewport" content="width=device-width, initial-scale=1.0">
<meta http-equiv="X-UA-Compatible" content="ie=edge">
<title>Document</title>
</head>
<body>
Check the console! (F12 to open dev tools)
<script src="/main.js"></script>
</body>
</html>

You can start a basic file server with npx live-server ./dist or npx http-server -c-1 ./dist, or setup your own server to serve the files in dist/. (Open the browser console to view the output.)

live-server automatically reloads the page for any file changes, while http-server does not. We use -c-1 with http-server to disable it’s aggressive caching. Both of these servers are only suitable for development and testing, and should not be used in production.

Run the server in a separate console so you don’t need to stop and restart it to run Webpack. npx will re-download live-server or http-server every time, so to avoid this slowdown when running it, you can install it to the project with npm i -D <package>, or install it globally npm i -g <package>. After that, npx will use the previously installed module.

Build modes

When you ran npx webpack, it printed a warning about missing the mode option. Let’s do it correctly by running npx webpack --mode development. Without a specific mode set, Webpack defaults to “production”, which mostly means that it uglifies the output.

Uglifying is basically minification, and it makes the file as small as possible by removing unnecessary whitespace and replacing variable names with shorter versions where safe. It can also remove static conditions like if (false === false) { ... }.

After running in development mode, take a look at dist/main.js. There is a lot of code in this file! Webpack does include some overhead to properly handle modules, but there is also inline sourcemaps of the code, which can be used by the browser to show you the original code files when debugging.

Finally, to build in production mode without a warning, run npx webpack --mode production. This will output the same code as npx webpack, but without the warning.

Using npm scripts

You can use Webpack with npx like we have so far, but you can make it simpler to keep the correct build modes straight by setting up npm scripts for each mode.

In package.json, replace this:

1
2
3
"scripts": {
"test": "echo \"Error: no test specified\" && exit 1"
},

with this:

1
2
3
4
5
"scripts": {
"dev": "webpack --mode development",
"build": "webpack --mode production",
"test": "echo \"Error: no test specified\" && exit 1"
},

Now you can run npm run dev for development mode, and npm run build for production mode. This exact build command is quite suitable for real projects, but you will probably want some other features for development.

Configuration

In most cases, you will end up needing to configure some options for Webpack. A lot of options can be provided as command line arguments, but the much cleaner standard approach is to use a Webpack config file.

Webpack will automatically look for a file called webpack.config.js in the folder it is being run in (generally the project root), or you can tell it exactly the file to use with the --config command line argument.

Create webpack.config.js with these contents:

1
2
3
4
5
6
7
8
9
const path = require('path');
module.exports = {
entry: './src/index.js',
output: {
filename: 'main.js',
path: path.resolve(__dirname, 'dist')
}
};

This is a regular Node.js module, using require() to load modules.

This configuration says to use the same entrypoint and output location and name as the Webpack defaults. You can change these options now to be whatever you want. If your project needs to use public as the folder for static assets, then you could change dist to public, or even use a subfolder.

There are many options for both entry and output in the Webpack docs.

Automatically building

In most circumstances, you want to build automatically when you save a file in your project which is being bundled while developing. There are two ways to do this, and which one you want depends on how you want to serve your files in development.

In Linux, the default file system max listener count is often too low to be able to watch the files in a project. This will cause an error like Error: ENOSPC in the console, which appears to suggest you are out of disk space. To fix this, you need to increase the max listener count with this command: echo fs.inotify.max_user_watches=524288 | sudo tee -a /etc/sysctl.conf && sudo sysctl -p. More Info.

Watch mode (your own server)

If you already have a server setup and can have it serve the files in the dist/ folder, then you can simply use Webpack’s built-in watch mode.

To do this, change your "dev" script in package.json to:

1
"dev": "webpack --mode development --watch",

When you run this, instead of just building and exiting, Webpack continues to run, and any time you make a change and save a file that is being bundled, the bundle will get rebuilt.

If your static server doesn’t automatically refresh the page when files change (such as http-server), you will need to refresh the page after you save your files.

You can setup LiveReload plugin which can refresh the page for you when your bundle is rebuilt. You should make sure you only do this for development. Setting up development-only Webpack config.

Dev Server (use webpack-dev-server)

If you don’t have a local file server to serve dist/ with, you can use webpack-dev-server, which combines Webpack with a small file server that has useful development features.

Install webpack-dev-server with npm i -D webpack-dev-server.

Add a devServer property to your Webpack config as below:

1
2
3
4
5
6
7
8
9
10
11
12
const path = require('path');
module.exports = {
entry: './src/index.js',
output: {
filename: 'main.js',
path: path.resolve(__dirname, 'dist')
},
devServer: {
contentBase: path.join(__dirname, 'dist'),
},
};

Replace your "dev" script in package.json with:

1
"dev": "webpack-dev-server --mode development --open",

If you are still running a static server like http-server or live-server, you can stop that process since webpack-dev-server includes that functionality.

Now when you run npm run dev, webpack-dev-server will start a file server with the contents of dist/, Webpack will run, and automatically run again any time a file that is bundled is saved. Additionally, webpack-dev-server includes some extra code which causes the browser to refresh any time the code rebuilds. With the --open option included, it will also open your browser to show the index.html file.

webpack-dev-server configuration options include a proxy option so that all requests which don’t match a bundle file are sent to another server.

More Webpack config

Webpack has two primary ways to extend it’s functionality. It supports a rich plugin ecosystem, which can provide features such as automatically injecting the paths to bundle into a generated html file, or displaying in-depth statistics about bundles. It also supports loaders, which are tools that run against imported files, and can run transforms on the code, or even move the original file to the output folder and make the imported value a path to that file.

The number one use-case for loaders is to run Babel transforms against your JavaScript code. Babel transforms can replace JSX code with JavaScript, remove Typescript type annotations, or most commonly: replace modern syntax with older syntax to support more browsers.

In most cases, you will want to run Babel against your code with the “env” preset, which compiles current JavaScript to older JavaScript.

Setup Babel and babel-loader

First, lets modify our entrypoint file to use a new syntax feature, so that we can see that it gets replaced.

Change src/index.js to:

1
2
3
4
5
6
7
8
import '@babel/polyfill';
import foo from './foo';
const obj1 = { a: '1' };
const obj2 = { ...obj1, b: '1' };
console.log('obj2.a === obj2.b', obj2.a === obj2.b);
foo();

The ... operator is part of ES2018, and needs to be compiled for Edge, and non-latest Safari.

Install Babel and babel-loader with npm i -D babel-loader @babel/core @babel/preset-env. Then install Babel Polyfill with npm i @babel/polyfill.

We need to add babel-loader into our Webpack config:

1
2
3
4
5
6
7
8
9
10
11
12
13
14
15
16
17
18
19
20
const path = require('path');
module.exports = {
entry: './src/index.js',
output: {
filename: 'main.js',
path: path.resolve(__dirname, 'dist')
},
module: {
rules: [
{
test: /\.js$/,
exclude: /node_modules/,
use: {
loader: 'babel-loader',
},
},
],
},
};

Then we need to setup a Babel config in babel.config.js:

1
2
3
4
5
6
7
8
9
10
11
12
13
14
module.exports = {
presets: [
['@babel/preset-env', {
useBuiltIns: 'entry',
modules: false,
targets: [
'last 2 firefox versions',
'last 2 chrome versions',
'last 2 edge versions',
'last 2 ios versions',
],
}]
],
};

This is an optimistic set of browsers, often you will need to support IE 11 as well.

Now when you build your project, any modern syntax is compiled to code that all browsers in your support list can run. This is specifically only for files in your project that are not in node_modules (this is what the exclude line in the babel-loader config does).

Syntax isn’t the only thing older browsers might not support though, so in addition to having Babel transform syntax, we also need to include Polyfills for newer standard library features. This is the import '@babel/polyfill'; in index.js. With the useBuiltIns: 'entry' option in the babel env config, that single polyfill import is transformed to only import the polyfills needed for the browser support list.

Currently there is an experimental option useBuiltIns: 'usage' which will only include polyfills for features that you actually use. In the future this could become the best practice.

Overview

What we have so far is a reasonable set of tools for building JavaScript browser applications.

With npm run build we transform a tree of source code modules from using modern JavaScript to being a single bundle file of broadly supported older JavaScript which we can include in our html.

Onward and Upward

Thus far, our build configuration is fairly simple, and is focused only on JavaScript and building a single application.

From the basic configuration created here, we can expand to support a lot of helpful features:

  • Code splitting (Separate a tree of your application).
  • Importing stylesheets and other static assets, to be included in the output folder.
  • Transforming non-JS code into JS (such as JSX, Typescript, Flow, and JavaScript proposal features).
  • Create a map (manifest) of output files for programmatic consumption.
  • Development only configuration options.

To explore these topics and more, head to the Getting started with Webpack landing page.

Using the Web Audio API

Have you ever wanted to make some noise in your browser? I wanted to generate some sound effects, and it made me curious about what tools are available in the browser.

What I found is the Web Audio API. I’m going to show how to play basic sounds, and lay the groundwork for building more advanced sound generators.

All examples can be directly pasted into jsfiddle and run. The first couple are just JavaScript, but the others use a short bit of HTML. I’m running these in Firefox, but Chrome and Edge should also work fine. Webkit-based browsers may not work, and IE has no support.

The WebAudio API is built around a “node” system. It somewhat parallels how you would connect sound modules or effects pedals together in real life.

The base object you need to work with is the AudioContext, created with new AudioContext() (or new webkitAudioContext() for Webkit-based browsers). This context object has factory methods to create the other nodes you use.

Basic sound output

Here’s how you output a simple tone (Warning, this is rather loud if run directly):

1
2
3
4
5
6
7
8
const audioContext = new (window.AudioContext || window.webkitAudioContext)();
const oscillator = audioContext.createOscillator();
oscillator.connect(audioContext.destination);
oscillator.frequency.setValueAtTime(440, audioContext.currentTime);
oscillator.start();
window.setTimeout(() => {
oscillator.stop();
}, 1000);

We already learned about the audioContext, and the rest is fairly straightforward as well. The audioContext.createOscillator() creates an OscillatorNode instance, which generates a tone. OscillatorNodes has AudioParam properties to control frequency (directly, and via a “detune” value, which seems to be more suitable for note-based music generation) and wave-shape.

OscillatorNode implement AudioNode, which is the base class. AudioNodes use the AudioParam interface for properties, which gives controls like setValueAtTime() used above. So an oscillator has a frequency property which has the AudioParam properties and methods for reading and writing. You can’t write to the frequency property directly (you can-ish, because it’s JavaScript, but it won’t “work”), instead you read from oscillator.frequency.value, and you can either write to the value property or use the time-based methods such as .setValueAtTime(). Generally, using the time-based methods is better, because they will overwrite any value written to the value property directly.

To use the output of an AudioNode, you call the .connect() method and pass the target, which can be another AudioNode, an AudioParam (for dynamic input), or audioContext.destination which represents the browser’s sound output (speakers, headphones). We connect our oscillator to audioContext.destination so we can hear the output.

We call .setValueAtTime() with 440 and audioContext.currentTime, which says we want a frequency of 440hz, and we want that to be applied now. To sets value in the future, you add time in seconds to the currentTime value.

To start the oscillator sound output we call .start(). After a 1 second we stop the output with .stop(). These are not start/pause controls like you might expect. Once you call .stop(), an OscillatorNode can not be re-started. For repeatedly doing something, you either need to use multiple oscillators, or use a single oscillator and disconnect it’s output or set the output volume to zero using a GainNode before the destination.

Fixing the volume problem

By default, the oscillator output is rather loud. Lets fix that by adding a GainNode.

1
2
3
4
5
6
7
8
9
10
11
const audioContext = new (window.AudioContext || window.webkitAudioContext)();
const volume = audioContext.createGain();
volume.connect(audioContext.destination);
volume.gain.setValueAtTime(.2, audioContext.currentTime);
const oscillator = audioContext.createOscillator();
oscillator.connect(volume);
oscillator.frequency.setValueAtTime(440, audioContext.currentTime);
oscillator.start();
window.setTimeout(() => {
oscillator.stop();
}, 1000);

Now, instead of connecting the oscillator to the output directly, we connect it to a GainNode which then connects to the destination. The GainNode has a gain AudioParam which takes a float value and multiplies the amplitude. So a value of 1 would be no change, .5 would be half, and 2 would be double. .2 (or 20%) makes for a fairly reasonable volume.

Doing something more interesting

Lets make a button that plays a sound!

1
2
<!-- HTML -->
<button id="play-sound">Play Sound</button>
1
2
3
4
5
6
7
8
9
10
11
12
13
14
15
16
17
18
// JavaScript
const audioContext = new (window.AudioContext || window.webkitAudioContext)();
const volume = audioContext.createGain();
volume.connect(audioContext.destination);
volume.gain.setValueAtTime(.2, audioContext.currentTime);
const button = document.getElementById('play-sound');
button.addEventListener('click', () => {
const oscillator = audioContext.createOscillator();
oscillator.connect(volume);
oscillator.frequency.setValueAtTime(440, audioContext.currentTime);
oscillator.start();
window.setTimeout(() => {
oscillator.stop();
oscillator.disconnect();
}, 500);
});

Our button click handler creates a new oscillator, connects it, sets the frequency, starts it, and then stops and disconnects it after 500ms.

This is the basis for how you play sounds on a trigger. Just create your oscillator, play it, and destroy it. Notice that if you click the button again before the sound stops, it does create a new oscillator and plays them both, which you can usually hear as a louder sound.

Exciting sounds

So far, we’ve only made boring single-frequency sounds. Lets do something a bit more interesting. If we just wanted to change the pitch played on the button press, that would be as simple as changing “440” to the desired frequency. This could be set from a dynamic input as well.

More interesting would be to play a series of sounds. Lets make a varying wave-form.

The html will be the same as above, with this JavaScript:

1
2
3
4
5
6
7
8
9
10
11
12
13
14
15
16
17
18
19
20
21
22
23
const audioContext = new (window.AudioContext || window.webkitAudioContext)();
const volume = audioContext.createGain();
volume.connect(audioContext.destination);
volume.gain.setValueAtTime(.2, audioContext.currentTime);
const button = document.getElementById('play-sound');
const frequencyList = [];
for (let i = 0; i < 1000; i++) {
frequencyList.push(Math.sin(i * Math.PI / 100) * 100 + 400);
}
button.addEventListener('click', () => {
const oscillator = audioContext.createOscillator();
oscillator.connect(volume);
frequencyList.forEach((frequency, time) => {
oscillator.frequency.setValueAtTime(frequency, audioContext.currentTime + time*.001);
});
oscillator.start();
window.setTimeout(() => {
oscillator.stop();
}, 1000);
});

Instead of just setting a frequency and calling it done, we run over an array of 1000 frequency values, setting them at intervals of 1ms so that we get a (to human perception) smooth variation of pitch. Any AudioParams can be set like this, so you can create arrays of frequency and volume (gain) values to play over time.

More!

Naturally, this is just the tip of the iceberg. Besides gain and oscillators, you can do other types of filtering and effects, including reverberation, delays, and distortion; you can use microphone input and uploaded audio files; and you can even do visualizations of the waveform output. A good place to start for more in-depth study is the MDN Web Audio API Guide. Especially look through the types of AudioNodes listed in Related pages for Web Audio API.

Sci-fi Prop Project

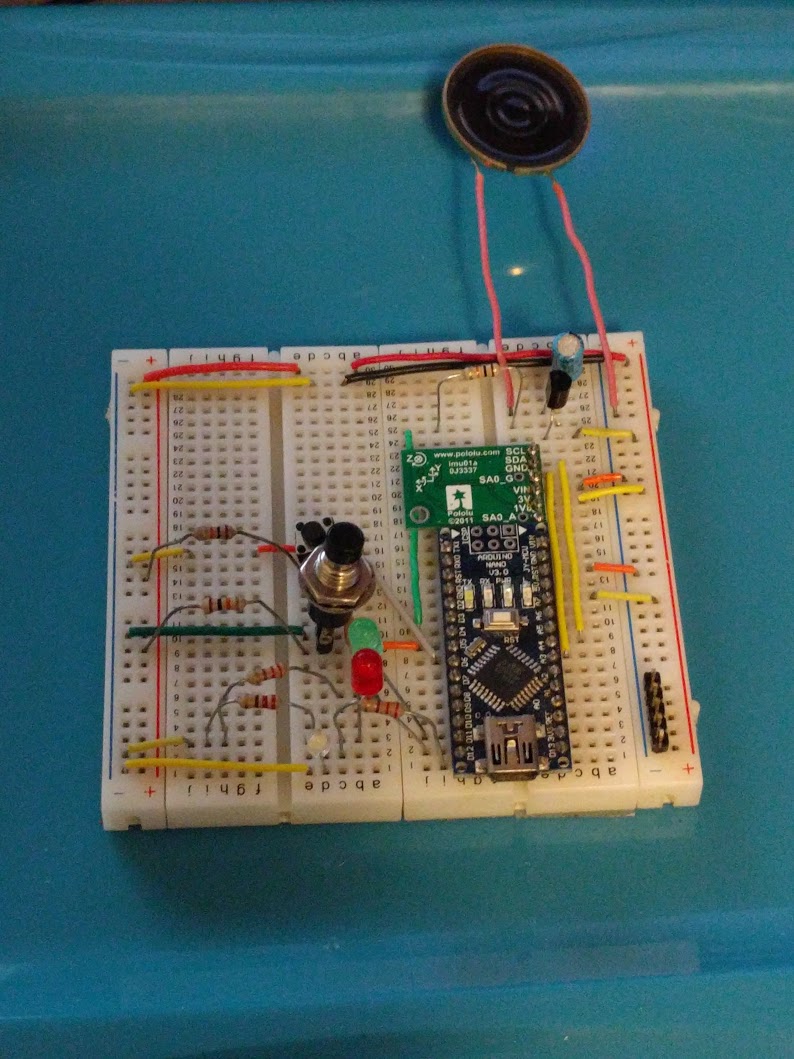
circuit on breadboard

What is it?

I wanted to build a “laser gun” module to install in a Nerf blaster shell. The module would connect to the trigger to fire, and have motion/gesture sensing for additional functionality (such as reloading).

Development hardware

BOM

Important parts

These are the pieces which actually make up the functionality.

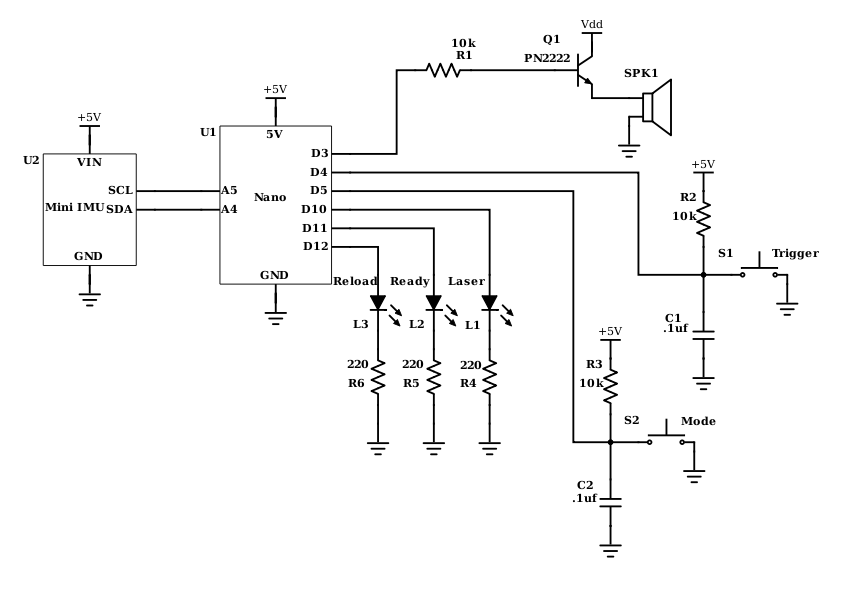
  • Arduino Nano - or cheap clone
  • Pololu Minu IMU - v1, but any should work
  • 3x LEDs - can be any desired types, or any other output driven by a high pin
  • Speaker
  • 2x momentary switches

Passives and drivers

This is the stuff to support the above parts. Change as needed.

LEDs

  • 3x 220 ohm resistor - I tend to use 220ohm, since I have a lot and it’s about right for most LEDs

Switches

  • 2x 10k ohm resistor - for pull-ups
  • 2x .1uf capacity - for debounce

Speaker

  • 1x 10k ohm resistor - for speaker driver pin
  • PN2222 transitor - speaker driver

Schematic

Layout of circuit

Software

The software I used is the latest version of the Arduino IDE for Linux, VSCode, and the libraries for the Pololu Mini IMU.

To use VSCode, you must check the External editor option in the Arduino IDE preferences.

Program V1

I started by running the library examples for the accelerometer/magnetometer and gyro chips on the IMU. From there, and extracted the necessary pieces to start building my own functionality.

Some of the basic code for accelerometer and gyro access:

1
2
3
4
5
6
7
8
9
10
11
12
13
14
15
16
17
18
19
20
21
22
23
24
25
26
27
28
29
30
31
32
33
34
35
36
37
38
39
40
41
42
43
44
45
46
47
48
49
50
51
#include <Wire.h>
#include <LSM303.h>
#include <L3G.h>

L3G gyro;
LSM303 acc;

void setup() {
Wire.begin();

if (!gyro.init()) {
// Failure message
// Serial.println("Failed to autodetect gyro type!");
while (1);
}

gyro.enableDefault();
acc.init();
acc.enableDefault();

// Disable magnetometer
acc.writeMagReg(0x02, 0b00000011);
// Change accelerometer scale to +-4g (default is +-2g)
acc.writeAccReg(0x23, 0b00010000);
}

// global gyro/acc values
char gx = 0;
char gy = 0;
char gz = 0;
char ax = 0;
char ay = 0;
char az = 0;

void loop() {
delay(50);

gyro.read();
acc.read();

// This project only needs low resolution, so divide by 255 for a signed 8bit value
gx = gyro.g.x / 255;
gy = gyro.g.y / 255;
gz = gyro.g.z / 255;
ax = acc.a.x / 255;
ay = acc.a.y / 255;
// Invert the z scale so that it shows a positive value for "up"
az = -acc.a.z / 255;

// Use values
}

Some basic steps from here to the full program included adding the simple firing code, with a global ammo count; adding a state machine-like logic which allows the program to be in READY, NEED_RELOAD, RELOADING, and other states; adding helper functions to handle sound effects; and setting up a non-blocking pause.

The full version 1 source.

How it works

After a short startup, the module plays tone, then moves to the READY state.

While READY, you can press the trigger button to fire shots. You can also press the mode button to change between rapid-fire and single-fire modes. In single-fire mode (one short beep), each trigger pull only fires once (semi-automatic) with a longer laser sound. In rapid-fire mode (two short beeps), the modules fire continuous short laser sounds while the trigger is pressed.

Once out of ammo, the module switches to NEED_RELOAD. From here, you can still change modes, but attempting to fire simply makes and out of ammo sound. To reload, you rotate in the positive direction along the Y axis to 90deg (from vertical). Once there the module goes into RELOADING.

In RELOADING, the modules makes a short two beep reloading sound, then starts ticking up the ammo count. You can interrupt the reload by rotating the module away from 90deg to the side. The ammo count will continue to rise until either MAX_AMMO is achieved, or the reload is interrupted. Once either of these happens, the module returns to READY state (or NEED_RELOAD if interrupted before any ammo is added).

Notes

  • The reloading state has a fairly wide (around 25-30deg from center) tolerance for the “90deg” position. This allows for much easier use than a smaller threshold, and allows the module to be jostled more, which can be important for something like a blaster prop.
  • The reloading state can only be entered from NEED_RELOAD, which itself can only be entered by emptying the ammo count. So while you can do a partial reload from empty, you can’t reload until you run out of ammo.
    • I’m not sure if I consider this a feature or a bug yet, so it may change.
  • The orientation of the Y axis depends on how the modules is mounted. At the moment, I’m assuming it would be such that reloading requires rotating the blaster along it’s “barrel”, with the top moving to the right side as you look down the blaster.
  • The sound effects are very basic. More complex sounds can be created, but the tone() method provided by the Arduino library is rather basic on it’s own. It is limited to producing a single-frequency square wave.

State Terminology

What does someone mean when they say “state” in React contexts? Glad you asked! Unfortunately, it’s not something with a simple answer. I can break “state” into at least five different meanings, all of which are used in documentation, IRC chats, forums posts, and elsewhere.

General state

The general idea of “state”, is the remembered events, data, and user interactions of the application. It is the part of an application which can change. For a longer definition, check out State (computer science) on Wikipedia.

Application state

A subset of the general state in an app is the “application state”. This is data relevant to the actual functionality of the application. It may have properties including form data, current user info, and lists of data.

View state

Another subset of the general state is “view state”. This is data which is used in the user interface to improve or change the user experience. This state is never relevant to the application, such that it is possible to have the exact same application functionality without any view state1. Included types of information in the view state may be whether a dropdown is open, the current page, or a selected theme.

Component state

This is where some confusion usually starts to set in. Many users (including blog, documentation, forum post, and real-time chat authors) also use “state” to refer to the built-in state handling functionality in React.Component (and React.PureComponent) classes. This functionality is not itself actual “state”, but is actually a type of “store”. “Component state” is just a tool, and it allows you to store any type of state.

\ state (e.g., “Redux state”)

In contrast to using “state” to refer to “component state”, it’s also used to refer specifically to state stored in other types of state stores. Currently, a popular state store is Redux, but this also applies to any external store (Mobx, Backbone, other Flux implementations). Sometimes, users will use “application state” to refer to state stored outside of React “component state”.

The Right Way

Of course, The Right Way doesn’t exist. Nobody wants to explicitly type “application state” or “component state” all the time, even though that would allow much less ambiguity.

When communicating with someone, I recommend verifying what they mean when they say “state” if it might be ambiguous, and being explicit at least once in a while yourself to help others understand you.

1. Generally this is true, but in most circumstances having a stateless user interface would require vast changes to an application or website, including moving everything into a single page and replacing dropdowns with different types of UIs (radio buttons, checkbox lists, etc). Even then, trying to remove some state such as mouse and scroll position would make it very difficult to maintain the same application functionality. To have a perfectly stateless UI for a stateful app would be very difficult or impossible.

How to Add css-loader to Webpack

One of the benefits of using Webpack is that is allows you to load non-JavaScript files using the standard JavaScript import statements. Specifically, this is regularly used to load stylesheets on a per-module basis.

The final results can be found in a branch from the base repo.

What we need to get started

Our baseline is a working Webpack project. A good starting point is my basic-webpack-react tutorial results. Run git clone https://github.com/samsch/basic-webpack-react.git, cd basic-webpack-react, and npm install.

Loaders for styles

Loading css in a useful way requires either two Webpack loaders, or a loader and a plugin. The easier setup to get started with is using style-loader and css-loader.

  • style-loader takes an imported css file, and makes it output as a <style> element with the css from the file.
  • css-loader parses a css file for @import, url(), and translates those into something Webpack can understand to import.

With these, you can have imports in your JavaScript modules like:

1
import './style.css';

Webpack will take that stylesheet – and anything it @imports – and include JavaScript in your bundle to put it in <style> tags in the output when the app starts.

The downside of this method is that styles can’t be cached by the browser separately. Later, we’ll use the other method for a better production setup.

Configuration

First install the loaders by running npm install -D style-loader css-loader.

Then we need to modify webpack.config.js. Add the new loader rule to the rules property as shown below.

1
2
3
4
5
6
7
8
9
10
11
12
13
module: {
rules: [
{
test : /\.jsx?/,
include: path.resolve(__dirname, 'src/'),
use: ['babel-loader'],
},
+ {
+ test: /\.css$/,
+ use: [ 'style-loader', 'css-loader' ]
+ },
],
},

That’s it! Now you can run npm start, and it will act exactly as before, but it’s ready to import css files.

Add some test styles

Let’s add import './style.css' to the top of src/foo.js.

1
2
3
4
5
6
+import './style.css';
+
import React from 'react';
import ReactDOM from 'react-dom';
const foo = function() {

The running Webpack process throws and error because style.css isn’t found. So let’s add src/style.css:

1
2
3
h1 {
border-bottom: solid 2px gray;
}

Now Webpack compiles, and the page should refresh with a border applied to the h1 tag.

Let’s add an imported style. Make src/paragraph.css:

1
2
3
4
p {
background: #ddd;
padding: 1rem;
}

And add an import line to src/style.css:

1
2
3
4
5
+@import "paragraph.css";
+
h1 {
border-bottom: solid 2px gray;
}

Note that we can use “paragraph.css” here, rather than “./paragraph.css” which Webpack would normally need for relative files. To import a file from an npm package, you can use a ~ prefix, like ~some-css-package/dist/style.css.

Now we have css styles imported from our modules, and css import bundling!

Separate style sheets

The above system actually works pretty well for smaller projects and development. But for larger projects and production, we often want separate stylesheets for caching.

To pull our styles into a new file, we use extract-text-webpack-plugin, so install that with npm i -D extract-text-webpack-plugin, and remove style-loader with npm remove style-loader. We need to make a couple changes in webpack.config.js.

At the top of the file:

1
2
3
4
5
const path = require('path');
+const ExtractTextPlugin = require("extract-text-webpack-plugin");
module.exports = {
entry: ['babel-polyfill', './src/main.js'],

And near the end of the file:

1
2
3
4
5
6
7
8
9
10
11
12
13
14
15
16
17
18
19
20
21
{
test : /\.jsx?/,
include: path.resolve(__dirname, 'src/'),
use: ['babel-loader'],
},
{
test: /\.css$/,
- use: [ 'style-loader', 'css-loader' ]
+ use: ExtractTextPlugin.extract({
+ use: 'css-loader',
+ }),
},
],
},
+ plugins: [
+ new ExtractTextPlugin({
+ filename: 'style.css',
+ allChunks: true,
+ }),
+ ],
};

Now if we re-run npm start, we don’t have our styles anymore! This is because the styles output into a new file, which isn’t automatically loaded. So we add a stylesheet link in public/index.html:

1
2
3
4
5
<meta http-equiv="X-UA-Compatible" content="ie=edge">
<title>Webpack bundle test page</title>
+ <link rel="stylesheet" href="/style.css">
<script src="/bundle.js" defer></script>
</head>

Refresh the page and your styles are back. If you check the network requests tab in your browser, you can see the stylesheet was loaded in separately.

This is now a mostly production-ready stylesheet management system.

The main pain-point for this configuration now is that files always have the same name, which means that you would need to do external versioning to bust the browser file cache. Fixing this is possible with a Webpack plugin, but it’s a bit out of scope for this guide.

The final results can be seen as a branch of the base repo.

Getting Started with React

This will be the fast course to get a productive React development flow going. The only real prerequisite (besides a working computer and internet connection) is having a recent version of Node.js installed (as written, this is version 7.9.0, and LTS 6.10.2).

What this guide does not do is teach you Javascript or React. This just gets the environment in place.

Let’s go!

First thing to do is create your new project folder (I’ll be using react-project in this guide), and run npm init. The requested information doesn’t directly impact what we are going to be doing, so use whatever values you want.

We need an html page to attach our app to, so create a public/ folder, and inside, create index.html. Paste this content into it:

1
2
3
4
5
6
7
8
9
10
11
<!DOCTYPE html>
<html lang="en">
<head>
<meta charset="UTF-8">
<title>Basic React App</title>
</head>
<body>
<div id="app"></div>
<script src="bundle.js"></script>
</body>
</html>

If you are looking at this and saying, “man, that’s a pretty sparse web page”, well, you’re right. For a “real” app, you are going to want to put your extra meta tags in, maybe Google Analytics, a link to your favicon, and whatever else you need. We’ll get to the content next.

Application source

Create a src/ folder in the root of your project. All of your project specific source will be in this folder. For now, just create a main.js file in src/, and copy these contents into it:

1
2
3
4
5
6
7
import React from 'react';
import ReactDOM from 'react-dom';
ReactDOM.render(
<h1>Hello, world!</h1>,
document.getElementById('app')
);

So now your project folder should look like this:

1
2
3
4
5
6
- react-project
|- package.json
|- src/
| |- main.js
|- public/
|- index.html

Well, we can see from above that we need at least a few dependencies from npm installed, so lets get started on those.

Run npm install --save react react-dom.

The react package is the ReactJS library, and react-dom is a sister library which lets you render a React virtual DOM to the real DOM.

That actually covers the entire source of the application. Now all we need to do is build it.

Setting up Webpack

So, we primarily need two tools for building a React application: Webpack, and Babel.

Babel is a Javascript compiler (sometimes called a transpiler). It takes JSX and modern (ES2015, ES2016, and beyond) Javascript syntax, and compiles it to ES5 Javascript, which allows your modern code to run in older browsers.

The compiled code potentially can work with even IE8 (with some extra effort). However, IE9 is the oldest browser which “normally” works. In 2017, IE11 and Android Browser are the targets of primary concern.

Webpack is a module bundler. You give it an entry point file which uses ES Modules or CommonJS (which is the same syntax that Node uses for its modules), and it finds and “bundles” all the required files into a single file, which you can then include in your web page.

So, lets install Webpack and Babel. Run npm install --save-dev webpack babel-core babel-loader babel-polyfill. Wait, what is babel-loader? Webpack plugins which change the bundled code are called loaders. babel-loader is then the Webpack plugin which allows Babel to be run against the files to be bundled. And babel-polyfill? That’s to fill in additions to Javascript in ES2015+ that do not require new syntax, such as methods like Object.includes and objects like Promise.

“That’s it right? now we just run webpack and we’re done, right?” Not quite.

Our next step is to configure webpack. Technically, we could forgo configuring, and just use command line arguments to the Webpack cli interface. That would look something like webpack src/main.js public/bundle.js --module-bind 'js=babel'. However, using a configuration file is much more expressive, gives you more options, and is easier to maintain. So create webpack.config.js in the root of your project, and copy this into it:

1
2
3
4
5
6
7
8
9
10
11
12
13
14
15
16
17
18
19
20
21
22
23
24
const webpack = require('webpack');
const path = require('path');
const BUILD_DIR = path.resolve(__dirname, 'public');
const APP_DIR = path.resolve(__dirname, 'src/');
const config = {
entry: ['babel-polyfill', APP_DIR + '/main.js'],
output: {
path: BUILD_DIR,
filename: 'bundle.js'
},
module : {
rules : [
{
test : /\.jsx?/,
include : APP_DIR,
use : 'babel-loader',
}
]
},
};
module.exports = config;

Wow, that’s a lot of configuration for a simple app! Let’s take a closer look though. The first two lines are just requiring Webpack and the Node “path” module, and the next two lines are just setting some constants.

After that we have the actual configuration for Webpack. One nice point to note is that Webpack’s configuration file is a Javascript file, not JSON like many others are (allowing comments, trailing commas, etc). In our configuration we set the entry property, which is the file that Webpack starts at (more on that in a moment); the output, which is where Webpack saves the compiled code; and the module property.

The entry configuration can take a string, array, or object. If you use a string, it should point at the single file that starts your application. If you use an array, Webpack will concatenate the files. Using an object allows you to have multiple entry points, which is for building multiple separate apps. In our case, we need our main.js file and babel-polyfill (which is loaded first).

Our module property has a rules property, which is an array of the defined loaders. For now, we are just defining babel-loader. test is a regex to match against file extensions. I’m using a pattern which matches .js and .jsx files. You could also choose to set it to only compile files with the JSX extension, by using /\.jsx/, or if you decide not to use .jsx at all, just use /\.js/ to .js files. The include property tells Webpack that you only want to compile files in a specific folder. This is because you should never need to compile files from node_modules, since libraries should already be compiled with Babel (if they needed to be). This only stops Webpack from running Babel on files outside of APP_DIR, it doesn’t stop Webpack from bundling those files into the output. The use property defines our loader, which is Babel.

The last line is simply exporting the configuration. By default, when Webpack runs, it uses webpack.config.js if it exists.

And that’s it for our Webpack configuration. Now we just need to add our command to package.json:

1
2
3
4
5
6
7
8
9
{
...
"scripts": {
...
"dev": "webpack -d --watch",
"build": "webpack -p"
},
...
}

We add two npm scripts, “dev” and “build”. “dev” will run Webpack with “-d –watch”, which sets webpack in debug mode (more verbose, and outputs code maps for the browser), and in watch mode, which means it continuously runs, re-compiling whenever a bundled file changes. “build” runs Webpack with “-p”, which enables production mode. In production mode, the output is uglified (using Uglify), and any instances of process.env.NODE_ENV are replaced with "production". That last part is important because it allows Uglify to remove React’s internal debugging tools (which lets it run faster).

Setup Babel

Ok, we’re almost there. We have everything in place except for a little bit of Babel configuration. This one is easy. Create .babelrc in your project root, and copy this into it:

1
2
3
{
"presets" : ["latest", "react"]
}

What this does is tell Babel to compile ES2015+ and JSX to ES5 Javascript. These presets don’t come with Babel, so install them with npm install --save-dev babel-preset-latest babel-preset-react.

This is the simple approach to the Babel config. For a more explicit configuration (such as for targeting ES2015 compatible browsers), check out @brigand’s config-wizard.

Run!

That pretty much covers it. And now you know why the React workflow is notorious for being difficult to setup. While it’s not actually that complex, there are many steps to the process, at least the first time through.

So, finally, to start your development environment, run npm run dev. You should see some output from Webpack, and two more files should appear in public/: bundle.js and bundle.js.map.

Now you just need a server to get these files into your browser. My go-to mini-server is http-server, available with npm. I install very few npm packages globally, but this is one. Install it with npm install -g http-server, then run it from your project root with http-server public. Now you should be able to visit localhost:8080 in your browser, and see the web app you just created!

Just give me the final product already

Here it is, the whole thing wrapped up in a Github Repository.

Getting Started with Webpack - Part 2

In Part 1, we setup basic production ready functionality in Webpack. We can organize our code into modules, build them into a single file bundle, and have the build process run automatically, refreshing our project in a webpage.

Our next step is to have our build system compile modern Javascript (ES2015, ES2016, ES2017) into code which can be run in current browsers (ES5). We also need to add in polyfills for some of the additional non-syntax language features.

We also will enable JSX compilation for use with React.

Loaders and our starting point

Webpack has a couple ways to extend its functionality. There is a plugin system, which used for tools such as UglifyJS for code minification, and there is the loader system. Loaders allow you to pre-process files before they are added to the bundle.

We will use the final product of Part 1 as our starting point. You can clone the basic-webpack-no-loaders repo to follow along, or if you followed Part 1, the project you ended up with.

Final result

If you don’t want to build the whole thing, or want to look ahead, the final result is in basic-webpack-react.

Adding Babel

Our first step is to add and configure Babel. Babel is a Javascript and near-Javascript compiler. The Webpack loader is called babel-loader, and depends on babel-core as a peer dependency. Install both with npm install -D babel-core babel-loader.

Next we need to setup a babelrc file in the project root. This file configures the Babel plugins we need.

To setup this file, I used @brigand‘s config-wizard, with options “Play it safe”, “None/Other”, [“IE11”, “iOS”, “Chrome”, “Firefox”]. This instructs us to install babel-preset-env with npm install -D babel-preset-env, and gives us our file content for .babelrc:

1
2
3
4
5
6
7
8
9
10
11
12
13
14
15
16
17
{
"presets": [
[
"env",
{
"targets": {
"browsers": [
"ie 11",
"last 2 Chrome versions",
"last 2 Firefox versions",
"last 2 iOS versions"
]
}
}
]
]
}

Now we need to add babel-loader to webpack.config.js. We’re adding a modules property with some options:

1
2
3
4
5
6
7
8
9
module: {
rules: [
{
test : /\.js/,
include: path.resolve(__dirname, 'src/'),
use: ['babel-loader'],
},
],
},

View diff of file change

With these changes, we can now use the same commands as before (npm start, npm run dev, npm run build), and it will work just the same, except that now if we use ES2015/16/17 code, it will be compiled to ES5 Javascript.

Polyfills

Now we need to add the Babel polyfill (which is actually core-js and regenerator). Install it with npm install -D babel-polyfill. There are a couple ways to include polyfills in your code. The simplest is to just add import 'babel-polyfill'; to the top of your entry file (src/main.js). A slightly cleaner approach is to include them via webpack config, which also makes the polyfills part of the build, rather than part of your code. We need to change the entry property in webpack.config.js to be entry: ['babel-polyfill', './src/main.js'],.

webpack.config.js diff

Test modern to ES5 compilation

Let’s show that our code is being compiled properly. Change srv/main.js to be:

1
2
3
4
5
6
7
import foo from './foo';
foo();
const j = () => console.log('Babel compilation is working!');
j();

If we compile with npm run build, and search in the (minified) public/bundle.js for “Babel compilation is working!”, we find function(){console.log("Babel compilation is working!")}, which is using the function keyword rather than using an arrow function like our source.

React… and more!

What we have now gives us great modern Javascript workflow, while supporting common browsers. Our next step takes us to features outside of Javascript. To work with React, most developers use JSX, which is an HTML-like language that compiles to Javascript. To add JSX support, all we need to do is install babel-preset-react, add it to .babelrc, and possibly make a minor change to our webpack config.

First add babel-preset-react with npm install -D babel-preset-react. Then change .babelrc to be:

1
2
3
4
5
6
7
8
9
10
11
12
13
14
15
16
17
18
{
"presets": [
[
"env",
{
"targets": {
"browsers": [
"last 2 Chrome versions",
"last 2 Firefox versions",
"last 2 iOS versions",
"ie 11"
]
}
}
],
"react"
]
}

Generated with config-wizard similar to before, this time replacing “None/Other” with “React”.

With just those changes, we can now compile JSX in our js files. Some developers prefer to use a different file extension for React components though: .jsx. We can support this by making a small change to our test line in webpack.config.js. Replace test : /\.js/, with test : /\.jsx?/,. Now Wepack will use babel-loader for .js and .jsx files.

webpack config diff

Test React compilation

To see that we can now compile JSX, lets change src/foo.js to run some React code:

1
2
3
4
5
6
7
8
9
10
11
12
13
14
import React from 'react';
import ReactDOM from 'react-dom';
const foo = function() {
ReactDOM.render(
<div>
<h1>Hello, world!</h1>
<p>This was rendered with React.</p>
</div>,
document.getElementById('app-body')
);
}
export default foo;

Since we’re importing React and ReactDOM, we also need to install them, so run npm install -D react react-dom.

Now we can run npm start, and we should see our “Hello, world!” and the rendered by React message.

Next steps

We have a fully functional Webpack and Babel workflow now, which supports modern Javascript and React. The final product can be found in basic-webpack-react.

For moving beyond what’s here, there are many Webpack loaders, and more features which can’t be covered in a basic guide. Some popular topics:

Happy coding!

Getting Started with Webpack

Modern Javascript best practice is to use either ES modules or CommonJS modules for front end code. However, not all browsers currently support a module system directly, so to allow this practice, we use a tool called a bundler, which parses modules and creates a single file containing the full source.

There are a couple options for bundlers, but the popularity contest is largely being won by Webpack. There is some notoriety around Webpack, mostly due to the ability to create monstrous configurations for complex builds. However, Webpack itself is fairly straightforward, and this post will walk through the basic setup and configuration.

In a hurry? The final product of this guide can be found in my basic-webpack-no-loaders repository.

Webpack basics

The simplest usage of Webpack is very easy. Let’s get a basic project started.

Don’t forget to reference the Webpack documentation for more details, and to explore the options that Webpack provides!

Prerequisites

You need to have Node.js installed.

For Linux and MacOS, the easiest way to install and work with Node is using nvm. Instructions for installing are on the nvm project page.

If using Windows, you can download an installer from the Node.js website.

The instructions are the same for Webpack in Windows, except you may need to use backslashes instead of slashes for paths on the command line. For example, webpack src/main.js public/bundle.js might need to be webpack src\main.js public\bundle.js in Windows.

You can of course use Yarn instead of npm for all the command below. Just remember to use yarn add -D <package> instead of npm install -D <package>.

Create a new project

Make a new folder for your project (I’m using basic-webpack). Then open this folder in a terminal.

Run npm init. It will prompt you for project details, but you can just hit enter for each option to use the default. In a real project, you would probably want to fill in actual details.

Next run npm install -D webpack. This will install Webpack as a development dependency.

Add source code

Let’s add some source code modules that we want to bundle!

Create a src/ folder in your project, and then create a src/foo.js file. Add the following to the file:

1
2
3
4
5
const foo = function() {
console.log('Ran foo()!');
}
export default foo;

Then create a src/main.js file, with this content:

1
2
3
4
import foo from './foo';
foo();

Now we can see that main.js is reliant on foo.js. Now we need to create a bundle, which is a single file with all the code in it, neatly packaged to be used in the browser.

Use Webpack

The simplest way to use Webpack is from the command line. Webpack, like most runnable npm modules, can be installed globally so that you could just run webpack <options> directly. However, the best practice is to install locally to the project. So then to run Webpack, we either need to use ./node_modules/.bin/webpack OR we can setup an npm script. We will be doing the latter.

In your package.json file (which was created by npm init above), add a line under the scripts property like this:

1
2
3
"scripts": {
"webpack": "webpack"
},

Now we can run Webpack with npm run webpack -- <options>.

Webpack runs on the command line with the form webpack <entry> <output>. We want to output our bundle to public/, and src/main.js is our entry file.

Run npm run webpack -- src/main.js public/bundle.js. (It will create the public/ folder automatically if it doesn’t exist.)

Profit!

That’s it! That’s all there is to running Webpack in it’s most basic form. You can change your package.json file to include the Weback command option so that you can just run npm run webpack. Change the line "webpack": "webpack", to be "webpack": "webpack src/main.js public/bundle.js",.

Actually…

However, this isn’t the standard way to use Webpack. There are a couple missing features which we usually want. You can actually do most of this from the command line, but the recommended path is to use a Webpack config file.

Basic config-driven Webpack

If you changed your package.json file to include the paths in the Webpack script command, revert that change so that it’s just:

1
2
3
"scripts": {
"webpack": "webpack"
},

Now create a webpack.config.js file in the project root, with these contents:

1
2
3
4
5
6
7
8
9
const path = require('path');
module.exports = {
entry: './src/main.js',
output: {
filename: 'bundle.js',
path: path.resolve(__dirname, 'public'),
},
};

This is the bare basics to do the same thing as the command line. While it is a bit more verbose, it also is fairly clear.

Now you can run npm run webpack, and it will automatically find the config file (we used the default name) and build the bundle.

Setup basic development and production modes

Webpack comes with some built-in development and production tool which can be enabled with command line options. Edit scripts in package.json again to be like:

1
2
3
4
"scripts": {
"dev": "webpack -d --watch",
"build": "webpack -p"
},

Now we can do a production build with npm run build. For development, we can run npm run dev, and it will re-compile any time a file changes which will affect the bundle.

The -d and -p are shortcut options. -d enables sourcemaps and turns on debug mode for loaders (more on loaders later). -p sets the NODE_ENV environment variable to “production” and replaces usages of process.env.NODE_ENV with ‘“production”‘ in your code. -p also turns on UglifyJSPlugin, which does minification and dead-code removal. With these two combined, code such as the following will be removed in production builds:

1
2
3
if(process.env.NODE_ENV !== "production") {
console.log('Debug mode!');
}

The sourcemaps are not generated as a separate file by default. You can choose a different sourcemap output with a setting in the webpack config file. Webpack devtool documentation.

Using the bundle, and automation!

What we have now is all you need to bundle Javascript files in development and production. All that needed is a server to serve the Javascript bundle, and a page that includes it.

In the basic-webpack-no-loaders repo, you can run checkout basic-production-ready to see the code as it should be if you followed along.

A quick look at what we have:

  • We can put ES module and CommonJS module source files in src/, and also include modules from node_modules/ installed with npm or Yarn.
  • We can do a development build on change with npm run dev, and we can create a production-ready bundle with npm run build.

Our next step is to make the developer experience (DX) even better, by setting up webpack-dev-server.

webpack-dev-server

Webpack-dev-server does two things: It acts as a static file server (by default), and it watches and bundles your source with some added code which will refresh your browser page when the source changes and the bundle is rebuilt.

Install webpack-dev-server with npm install webpack-dev-server.

Next add a start script to package.json:

1
2
3
4
5
"scripts": {
"start": "webpack-dev-server -d --open",
"dev": "webpack -d --watch",
"build": "webpack -p"
},

If we had an index.html file in our project root, and it used a script with a source that pointed to /bundle.js, then we could just run npm start and serve that. However, we don’t really want our app to serve from the project root, we want to serve from the public/ folder. Let’s add a bit of configuration to webpack.config.js:

1
2
3
4
5
6
7
8
9
10
11
12
13
const path = require('path');
module.exports = {
entry: './src/main.js',
output: {
filename: 'bundle.js',
path: path.resolve(__dirname, 'public'),
},
devServer: {
contentBase: path.join(__dirname, "public"),
https: true,
},
};

The https setting is optional. These days HTTPS is strongly preferred for all websites. This option will set the dev server to automatically create a self-signed cert, and open the page via with https. You can also set a cert, key, and ca file. Check the devServer documentation for instructions.

Next create public/index.html, and put this content in it:

1
2
3
4
5
6
7
8
9
10
11
12
13
<!DOCTYPE html>
<html lang="en">
<head>
<meta charset="UTF-8">
<meta name="viewport" content="width=device-width, initial-scale=1.0">
<meta http-equiv="X-UA-Compatible" content="ie=edge">
<title>Webpack bundle test page</title>
<script src="/bundle.js" defer></script>
</head>
<body id="app-body">
<h1>Waiting for Javascript...</h1>
</body>
</html>

That’s all we need, but to give us a slightly better first look, lets update src/foo.js to modify the html:

1
2
3
4
5
6
7
8
9
10
const foo = function() {
console.log('Ran foo()!');
const date = new Date().toDateString();
document.getElementById('app-body').innerHTML = `<h1>Hello, world!</h1><p>This is bundled Javascript! Today is: ${date}</p>`;
if(process.env.NODE_ENV !== "production") {
console.log('Debug mode!');
}
}
export default foo;

Now with these changes, run npm start. This should open a new page in your browser with the above html.

Since it will be using a self-signed cert, you will need to click through the “Advanced” option to allow it. In Chrome, you click “Proceed to (unsafe)”, and in Firefox you click “Add Exception…” and I recommend unchecking the permanent option (since the cert won’t last very long anyway).

Congratulations! You now have webpack-dev-server running! You can test it out by changing src/main.js or src/foo.js. When you save changes to either file, the webpage in your browser will refresh with the new bundle.

The final product is available to clone in basic-webpack-no-loaders.

Next steps

What we have now is a production ready Javascript build system. To make it your own, you can replace, change, and remove the files in src/, just make sure that the entry property in webpack.config.js points to your entry file (some common files are src/main.js, src/index.js, and lib/index.js).

The most common extra configuration for Webpack is to include babel-loader with preset to compile modern Javascript to ES5 Javascript for browser compatibility. That will be explored in the next post.

Happy coding!