What is it?
I wanted to build a “laser gun” module to install in a Nerf blaster shell. The module would connect to the trigger to fire, and have motion/gesture sensing for additional functionality (such as reloading).
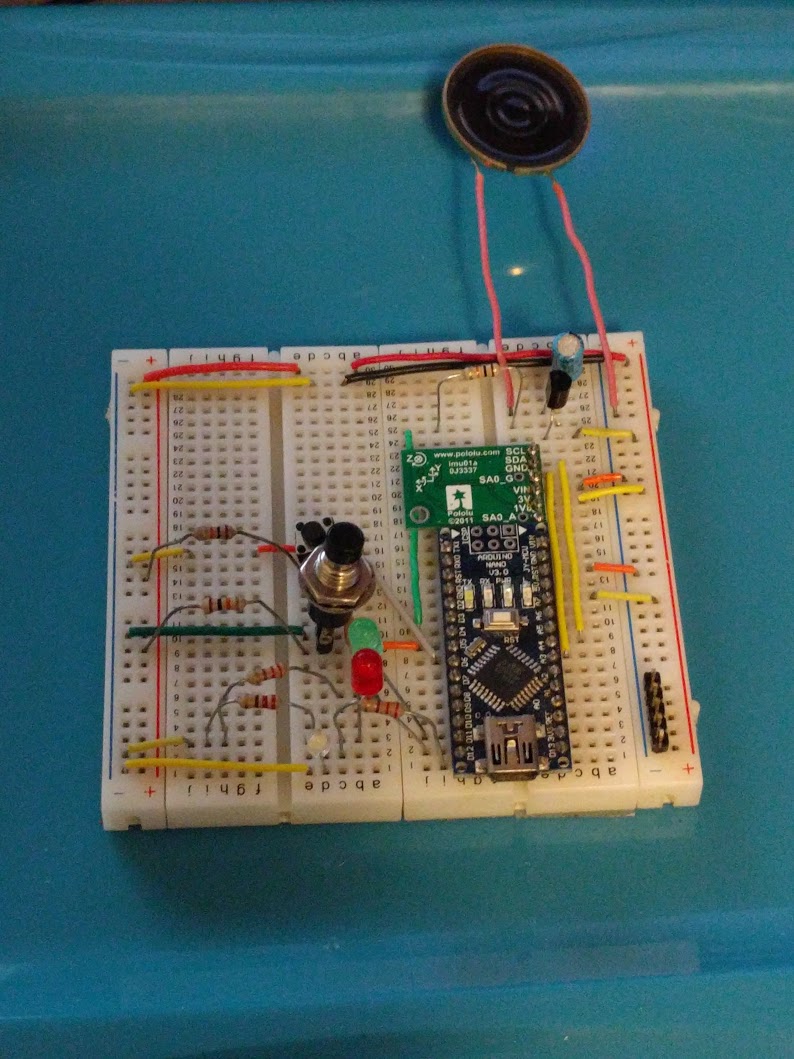
Development hardware
BOM
Important parts
These are the pieces which actually make up the functionality.
- Arduino Nano - or cheap clone
- Pololu Minu IMU - v1, but any should work
- 3x LEDs - can be any desired types, or any other output driven by a high pin
- Speaker
- 2x momentary switches
Passives and drivers
This is the stuff to support the above parts. Change as needed.
LEDs
- 3x 220 ohm resistor - I tend to use 220ohm, since I have a lot and it’s about right for most LEDs
Switches
- 2x 10k ohm resistor - for pull-ups
- 2x .1uf capacity - for debounce
Speaker
- 1x 10k ohm resistor - for speaker driver pin
- PN2222 transitor - speaker driver
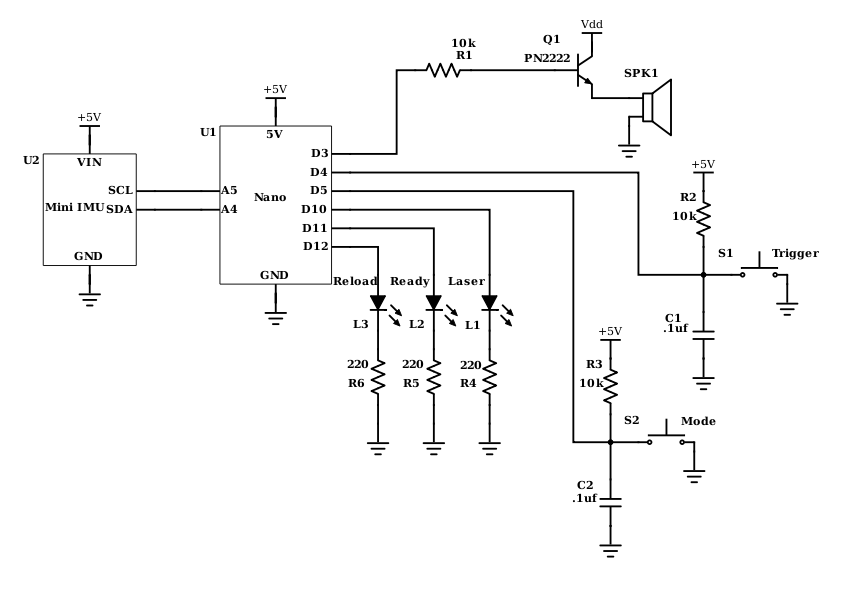
Schematic
Software
The software I used is the latest version of the Arduino IDE for Linux, VSCode, and the libraries for the Pololu Mini IMU.
To use VSCode, you must check the External editor option in the Arduino IDE preferences.
Program V1
I started by running the library examples for the accelerometer/magnetometer and gyro chips on the IMU. From there, and extracted the necessary pieces to start building my own functionality.
Some of the basic code for accelerometer and gyro access:
1 |
|
Some basic steps from here to the full program included adding the simple firing code, with a global ammo count; adding a state machine-like logic which allows the program to be in READY, NEED_RELOAD, RELOADING, and other states; adding helper functions to handle sound effects; and setting up a non-blocking pause.
How it works
After a short startup, the module plays tone, then moves to the READY state.
While READY, you can press the trigger button to fire shots. You can also press the mode button to change between rapid-fire and single-fire modes. In single-fire mode (one short beep), each trigger pull only fires once (semi-automatic) with a longer laser sound. In rapid-fire mode (two short beeps), the modules fire continuous short laser sounds while the trigger is pressed.
Once out of ammo, the module switches to NEED_RELOAD. From here, you can still change modes, but attempting to fire simply makes and out of ammo sound. To reload, you rotate in the positive direction along the Y axis to 90deg (from vertical). Once there the module goes into RELOADING.
In RELOADING, the modules makes a short two beep reloading sound, then starts ticking up the ammo count. You can interrupt the reload by rotating the module away from 90deg to the side. The ammo count will continue to rise until either MAX_AMMO is achieved, or the reload is interrupted. Once either of these happens, the module returns to READY state (or NEED_RELOAD if interrupted before any ammo is added).
Notes
- The reloading state has a fairly wide (around 25-30deg from center) tolerance for the “90deg” position. This allows for much easier use than a smaller threshold, and allows the module to be jostled more, which can be important for something like a blaster prop.
- The reloading state can only be entered from NEED_RELOAD, which itself can only be entered by emptying the ammo count. So while you can do a partial reload from empty, you can’t reload until you run out of ammo.
- I’m not sure if I consider this a feature or a bug yet, so it may change.
- The orientation of the Y axis depends on how the modules is mounted. At the moment, I’m assuming it would be such that reloading requires rotating the blaster along it’s “barrel”, with the top moving to the right side as you look down the blaster.
- The sound effects are very basic. More complex sounds can be created, but the
tone()method provided by the Arduino library is rather basic on it’s own. It is limited to producing a single-frequency square wave.